

Manual
The whole manual is on this page. Each chapter also has its own address. Changelog · Feature requests and roadmap.
Getting started
What it does
Telfa in Bitrix24 connects your Telfa PBX with Bitrix24 CRM. You place calls from the CRM, finished calls become activities, SMS can be sent and received, and an operator can clock in and take a break without a SIP connector.
Who does what
An administrator installs the app, pastes the Telfa token, chooses numbers and pairs people. An operator opens «My agent status» and works with the call card. The call overview is «Call overview».
Where it appears
- The app itself is in the Bitrix24 left menu.
- «My agent status» is the operator panel.
- «Call overview» shows today's calls.
- A call card opens from Bitrix24 telephony when a call is for you.
- «Operator panel on the start page» is a panel an administrator can add on the Bitrix24 start page. It needs the start-page permission, which a new Market version asks for.
Language
The buttons follow the portal language. An administrator sets it in «App and panel language». See Language.
Open the app from inside Bitrix24. A bare browser tab is the public website, not the app. The installer says «Start the installation from Bitrix24 (Market → Telfa → Install).»
Installation
Install from the Market
Install the app from Bitrix24 Market and start it with Market → Telfa → Install. The installer registers a telephony line and the SMS provider Telfa SMS. Finish by opening the app and the setup wizard.
You need a Bitrix24 cloud plan with telephony, and the right to install apps. The public install button on this website stays hidden until the Market address exists.
What the installer registers
- A telephony line in Bitrix24 for each number you connect later. The line name is "Telfa" plus the number.
- The SMS provider «Telfa SMS», so CRM can send SMS through your Telfa account.
- The start-page panel, on a Market version that includes the start-page permission. An existing portal updates or reinstalls to grant it.
The app asks Bitrix24 for telephony, CRM, a short user profile, working time, the message service, and the start page. Telephony and CRM write calls and activities. The user profile is how people are paired. Working time is the clock-in and break. The message service is SMS. The start page is only the operator panel.
Uninstall and install again
Uninstall removes the Bitrix24 sign-in tokens and the Telfa key from our server. If Telfa does not answer, an encrypted copy of the key is kept for at most 14 days, only so the webhook addresses we added can still be removed. Numbers stay in your Telfa account. CRM activities already written stay in Bitrix24.
Installing again on the same portal asks for the token and the numbers again.
Setup wizard
The five steps
Open Step-by-step setup. Connect Telfa, choose numbers, pair users, set incoming calls, then run the test. Connect number adds our webhook address and keeps the addresses already on that number.
The screen is «Step-by-step setup». The steps stay in order:
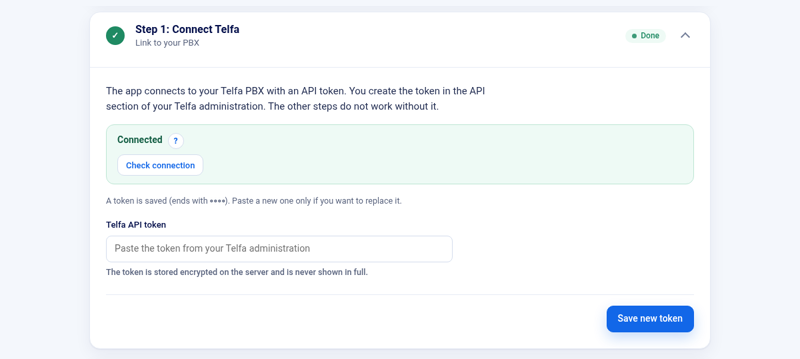
- «Connect Telfa» — paste the token and use «Check connection». Details are in Connection key.
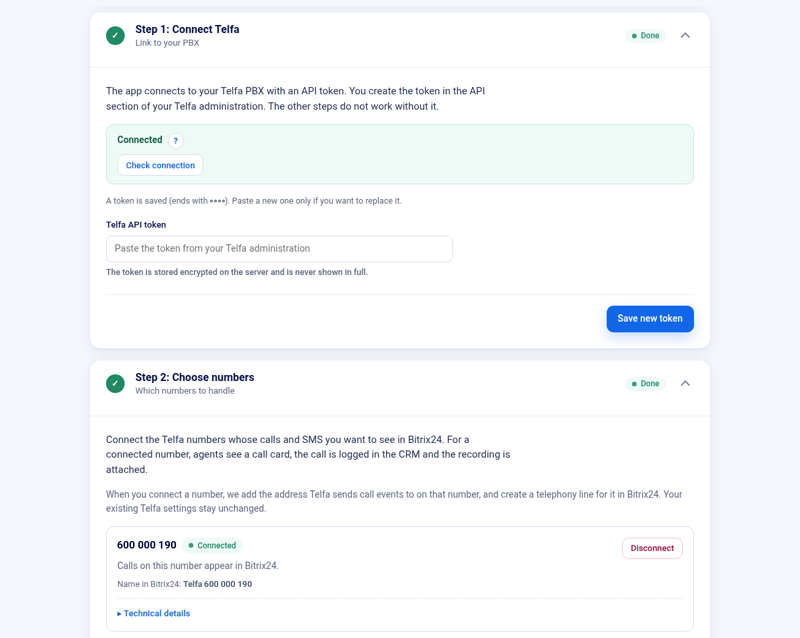
- «Choose numbers» — pick the Telfa numbers that should ring in this portal. «Connect number» creates the Bitrix24 line "Telfa" plus the number, and asks you to confirm «Enable Telfa webhooks for this number». Existing webhook addresses on that number stay. You can also choose «Add past calls»: «Don't add», or the last 7, 30, 90, 180 or 365 days. That choice is made once in the wizard.
- «Pair users» — match each Bitrix24 user with a Telfa user, then «Save pairing».
- «Incoming calls» — set «Who sees the call card in Bitrix24» and save. «Save group to Telfa» writes the group and the queue. The app does not rewrite the phone number’s own plan. The step that continues with the plan is added in Telfa. See Queues and groups.
- «Test» — place a test call and confirm the card. «Who will see the card?» shows who receives it. «Send test SMS» sends a short test SMS.
Behaviour in Bitrix24
The «Behaviour in Bitrix24» card is what the integration does in Bitrix24. The defaults suit most companies. Save changes with the button at the bottom.
- «Show the card for incoming calls» — an incoming call opens the card.
- «Show the card to whoever’s phone is ringing» — the person Telfa is ringing sees the card.
- «Show the card for outgoing calls» — the agent who calls from Bitrix24 sees the card.
- «Create unknown callers in the CRM» — an unknown number creates a CRM record.
- «Log missed calls in the CRM» — a missed call becomes an activity. Without this switch a missed call is not written to the CRM.
- «Missed-call safety net» — the app asks Telfa for missed calls in case a message got lost on the way.
- «Log SMS in the CRM» — sent and received SMS appear in the contact’s history. The SMS import needs this setting.
After the wizard
New calls are handled by Call sync and history. SMS is a separate card, SMS. Outgoing calls from CRM use the telephony line created for the number. Turn on «Save call recordings to the CRM» if Telfa records the call and you want that recording on the CRM activity.
Connection key
Paste and check
In the Telfa administration create an API token and paste it into Telfa API token. Use Check connection. A token Telfa rejects is not saved. If Telfa does not answer, the saved key is left as it was.
The field is «Telfa API token». The button is «Check connection», on the step «Connect Telfa».
Use a token from the Telfa administration that is allowed to read the numbers and users you want to connect. The app does not accept the token until Telfa recognises it.
When the check fails
- If Telfa refuses the token while reading (it does not recognise it), the new token is not saved. When a previous key is still valid, that key stays. When the saved key is already invalid, the app asks for a valid token.
- If Telfa does not answer (network, outage, or a temporary server error on the read), the token is not saved either. That is not the same as an invalid key. The message says Telfa is unavailable, and the saved key stays as it was.
- A refusal while writing a change does not by itself mark the key invalid. The key is marked invalid when a read is refused.
Do not send the token to support. Say which portal and what the screen showed.
Webhook consent
«Connect number» opens «Enable Telfa webhooks for this number». Confirming it appends our address for that number. Addresses that were already there are kept. The dialog also says whether an SMS webhook can be enabled for that number.
Each number has «Disconnect». Disconnecting stops calls from that number appearing in Bitrix24. Other settings in Telfa stay as they were.
«Replace the address for Telfa» is under «Advanced settings». Use it when you suspect the address Telfa sends calls to has leaked. The address is replaced on connected numbers. The previous one still works for a while.
Replacing the token
Paste a new token and check the connection again. The previous token is replaced only after the check succeeds. If Telfa refuses the new one, the previous valid key remains.
Call sync and history
Live calls
«Call synchronization» writes a finished call into Bitrix24 telephony history and into the CRM. A missed call is written only when «Log missed calls in the CRM» is on. «Missed-call safety net» asks Telfa for missed calls in case a message from Telfa got lost on the way. Before writing, the app checks whether that call is already in Bitrix24 and skips it if it is.
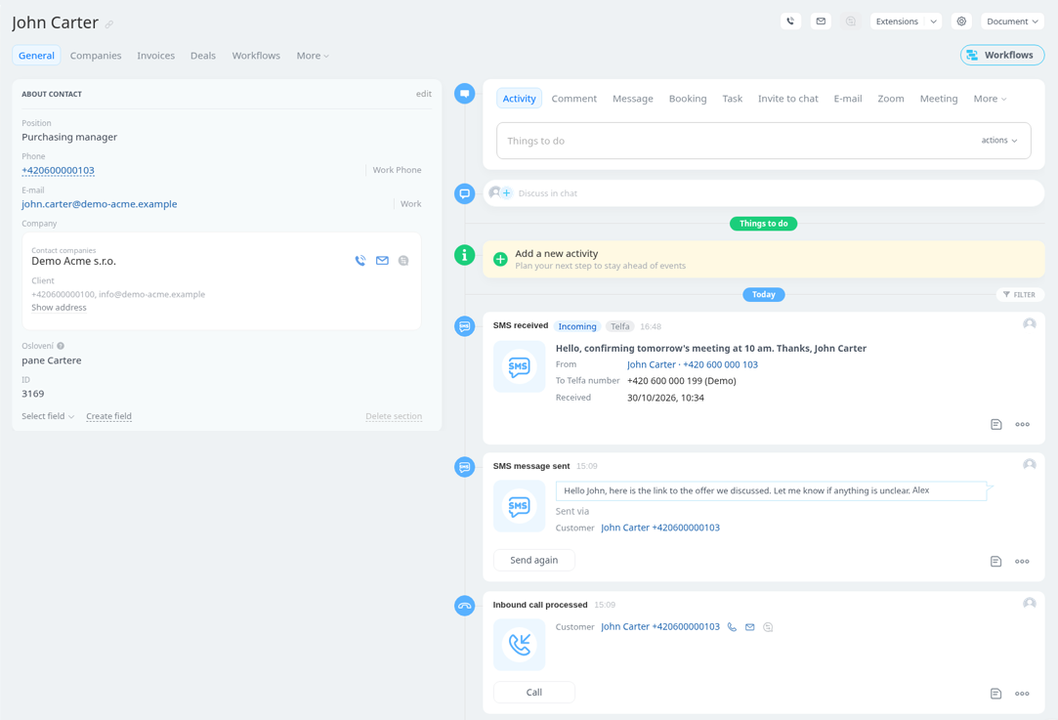
With «Save call recordings to the CRM», a recording Telfa still has is attached to the call after hang-up. Telfa keeps recordings for 90–365 days depending on the plan. Older calls are written without a recording. If the recording is already gone, the call stays in Bitrix24 without it and the app does not ask again.
The audio is handed to Bitrix24 for that attachment. It is not kept as a file library in the app.
The first backfill
On «Choose numbers», «Add past calls» offers «Don't add» or the last 7, 30, 90, 180 or 365 days. You choose once in the wizard. Later additions are done from «Call synchronization», not by repeating that first choice.
Older history
«Import older history» is for calls and SMS older than what «Add calls from a date» covers. The import walks Telfa history from the oldest records to the newest. It is slow. You can pause it and continue. A second run does not create a second copy of a record that was already written: the same record is skipped.
«What to import» is «Calls and SMS», «Calls only» or «SMS only». SMS are imported only when «Log SMS in the CRM» is on. A missed call is included only when «Log missed calls in the CRM» is on. Calls and sent SMS already in Bitrix24 are skipped. Received SMS from the time the app started recording them are not imported again. Only a message the app’s records show was never written is filled in.
Recordings on that import follow the same 90–365 day window. Calls older than that are stored without a recording.
If calls are missing
Check that the number is connected, that the key still passes «Check connection», and that the call is not sitting in Calls and SMS that could not be written. A call is not duplicated by starting the import again.
Calls and SMS that could not be written
Why a row appears
A finished call or an SMS is written into your Bitrix24. When that write does not succeed, the app keeps a row so the item is not only in a log you cannot see. Calls wait with the sync record. SMS that failed are listed under «SMS that could not be written».
A temporary problem (Bitrix24 or Telfa busy, or a rate limit) is retried with a growing pause. The import of older history stops after repeated temporary errors or a lasting error, and you continue it from «Import older history» after the cause is fixed.
What is stored for a failed SMS
A row that is only waiting to be written does not store the phone number or the message text. A row that failed keeps a sealed copy, including the text, until the write succeeds or for 30 days after the first failure. Then it is deleted.
What to check
- The Telfa key still passes «Check connection».
- The Bitrix24 user who installed the app can still open the CRM.
- The number is still connected in «Choose numbers».
Do not send the API token with a support request. The portal domain, the time, and the number are enough.
SMS
Sending
The installer registers the provider «Telfa SMS». In the CRM, choose that provider to send an SMS through your Telfa account. Telfa bills the message. The app needs a number that has an SMS gateway; the webhook dialog says «SMS webhook can be enabled» or that there is no SMS gateway.
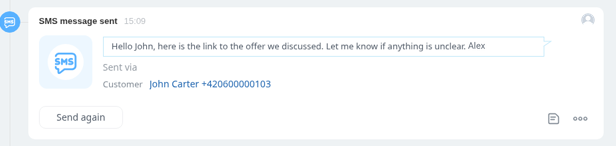
The text of a message you send is used for that send. A successful CRM record lives in your Bitrix24.
A received SMS
«How to show a received SMS in Bitrix24» has two modes:
- «Activity to handle» — someone should work the message.
- «Information only (recommended)» — the message is a record, not a task.
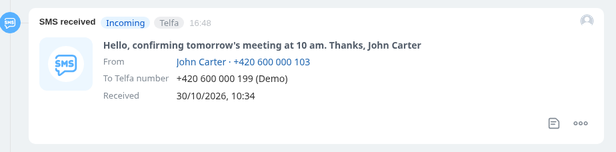
The card is «SMS». Messages that could not be written are under «SMS that could not be written» and are described in Calls and SMS that could not be written.
If an SMS does not arrive
Check the gateway note on the number, the token, and the failed-SMS list. The 30-day deletion applies only to rows that never got written.
Operator
My agent status
Open the operator panel from the app with «My agent status». At the top, «Status» shows working time and the Telfa state; below it is «My lines (queues)». «Clock in» and clock-out follow Bitrix24 working time and Telfa. A break in working time is sent to Telfa as well.
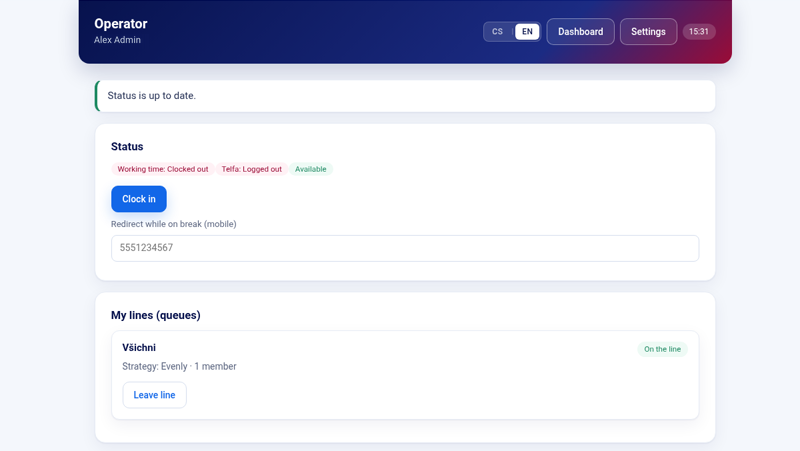
Telfa pause
«Telfa pause» is an extra pause inside Telfa. During that pause the app can redirect calls to the operator's mobile. When the pause ends, the previous redirect is restored.
The mobile number is masked on screen.
What I see
«Call overview» shows call statistics for the portal. An administrator opens it from the operator panel with «Dashboard». The call card itself opens from Bitrix24 when a call is offered to you. Who receives that card is set by an administrator under «Who sees the call card in Bitrix24».
Start page
An administrator adds «Operator panel on the start page» from the Bitrix24 start-page editor, section Other. The panel needs the start-page permission. On a portal installed before that permission existed, update or reinstall the Market version that asks for it. The panel shows the same status actions as «My agent status».
Open the panel from inside Bitrix24. A direct browser tab does not sign you in.
Queues and groups
A group decides whose phone rings, in which order, and what happens when nobody answers. Create a new group in the Telfa administration. Set it up in the app.
Who sees the card
«Incoming calls» includes «Who sees the call card in Bitrix24». See Setup wizard.
Group and queue
The step «Incoming calls» has «Agent groups (in Telfa)». An administrator sets the members, how calls are distributed, the ring time, the maximum wait, the opening hours and the announcements. «Save group to Telfa» shows a preview first, and writes the group only after that.
A change of group members is saved through the Telfa API. If Telfa rejects the change, the app shows an error and nothing is changed.
The app does not write into a plan that belongs to a phone number. It stores the group settings in its own plan. In Telfa, add the step that continues with that plan on the number. The app shows «Linking a number to our plan» and «Check the link». The status is «Connected» or «Not connected».
If the members of the group change in Telfa after the screen was opened, the save stops. The message says the group cannot be saved now. Mobile numbers are masked on screen.
Users
Pairing
«Pair users» matches a Bitrix24 user with a Telfa user. A suggestion uses the extension, the login and the name. «Save pairing» stores the match. See Setup wizard.
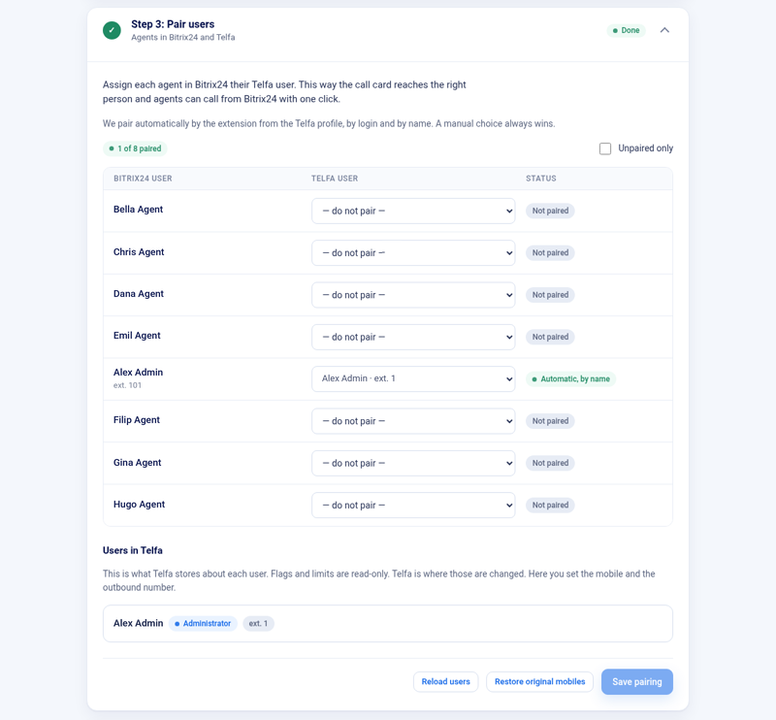
Users in Telfa
«Users in Telfa» shows what Telfa stores about each user. Flags and limits are read-only. In the app, «Mobile» is saved with «Save mobile» and «Outbound number» with «Save outbound number». «Restore original mobiles» puts back a mobile this app changed. Mobile numbers are masked on screen.
Contacts and companies
Copying contacts and companies is turned on for the portal on request through vJednom support. Until then, the «Contacts and companies in Telfa» card stays hidden and nothing is copied. After that, the administrator chooses under «What to copy» whether contacts, companies, or both are copied.
What the sync does
The «Contacts and companies in Telfa» card is shown only once copying is on for the portal. Bitrix24 is the source. Contacts and companies are written into the Telfa phone book. Nothing in Telfa is deleted unless the administrator chooses that.
«What to copy» chooses contacts, companies and where they are written in Telfa. «Count the preview» writes nothing. «Start the transfer» starts the bulk write. The run can be paused.
«When the Bitrix24 record is deleted» says whether the Telfa record stays, or is deleted.
Language
One language for the portal
«App and panel language» is set by an administrator and applies to the whole portal: the app, the operator panel and the start-page panel. It is not a personal preference.
A portal that has never chosen a language stays Czech.
This website
The public pages have their own CS | EN switch. That switch saves a cookie in your browser. It does not change the language inside Bitrix24.
The page you are on
The manual follows the language of the address (/en/ or /cs/). The in-app language and this website are independent.
Troubleshooting
Open the app from Bitrix24
The installer and the app expect to run inside Bitrix24. In a normal browser tab the message is to open the app from Bitrix24. Use the left menu, or start the installation with «Start the installation from Bitrix24 (Market → Telfa → Install).»
If the Bitrix24 window does not answer in time, the error stays on screen and, on this build, links to this website. The link does not sign you in.
The key
If «Check connection» says the token is refused, paste a token Telfa recognises. A token that is refused is not saved over a working one. If the message says Telfa is unavailable, wait and try the same token again. See Connection key.
Calls do not appear
- The number is connected in «Choose numbers».
- Webhooks for that number were confirmed with «Enable Telfa webhooks for this number».
- The call is not listed under Calls and SMS that could not be written.
- «Who sees the call card in Bitrix24» includes the person who expected the card.
SMS does not arrive
Check the SMS gateway note on the number, the provider «Telfa SMS», and «SMS that could not be written».
What to send to support
Write to [email protected] or call +420 734 249 993. Include the portal domain, the time, the number, and what the screen said. Never include the API token.
Response within 72 hours.